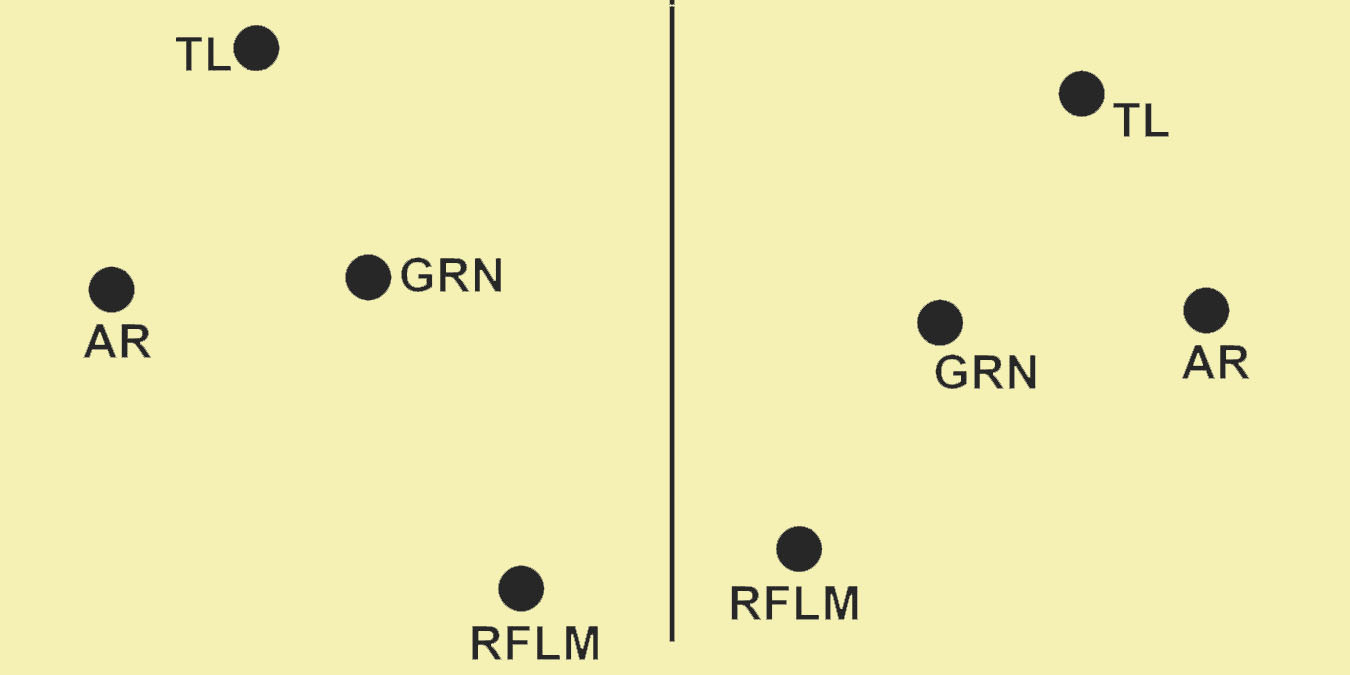
Figure 2-7: Fire Team Wedge
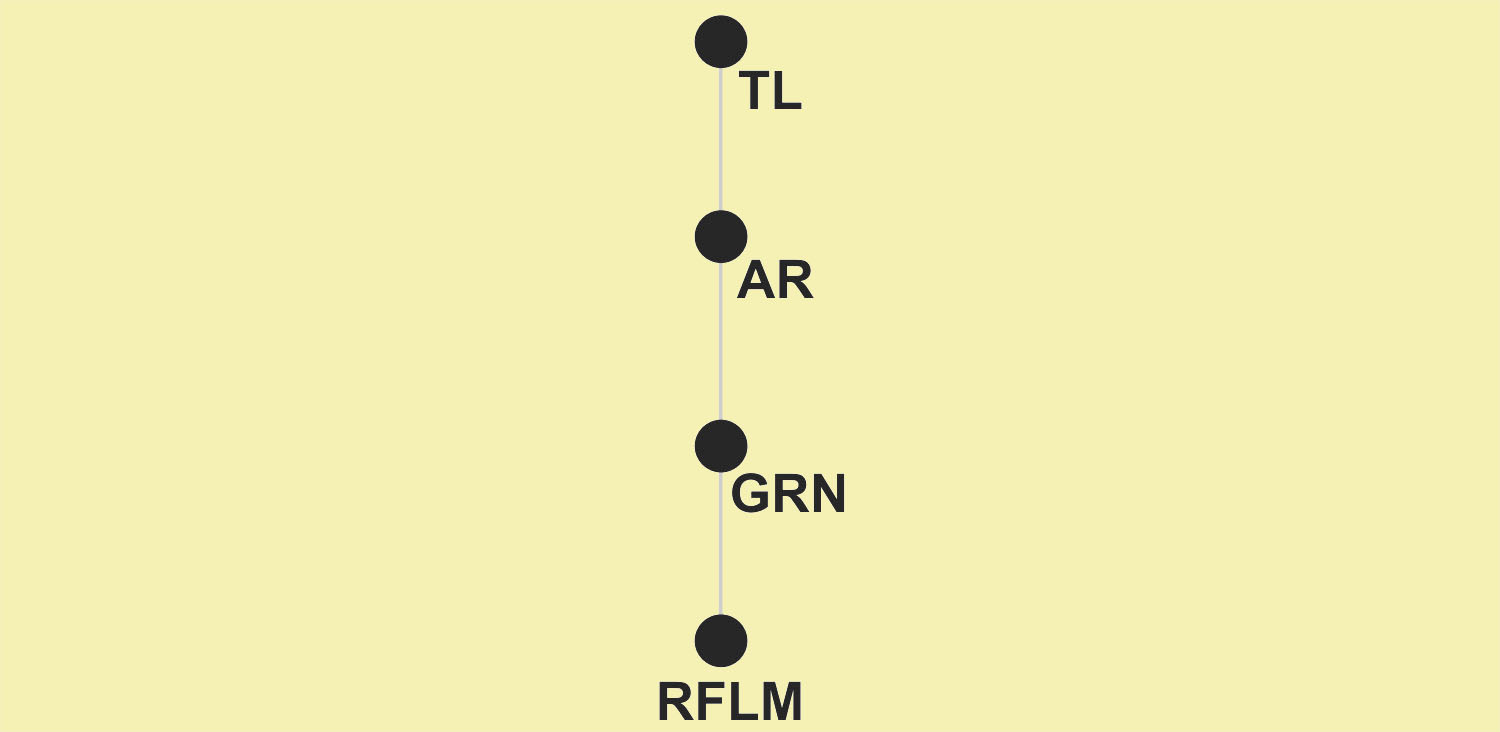
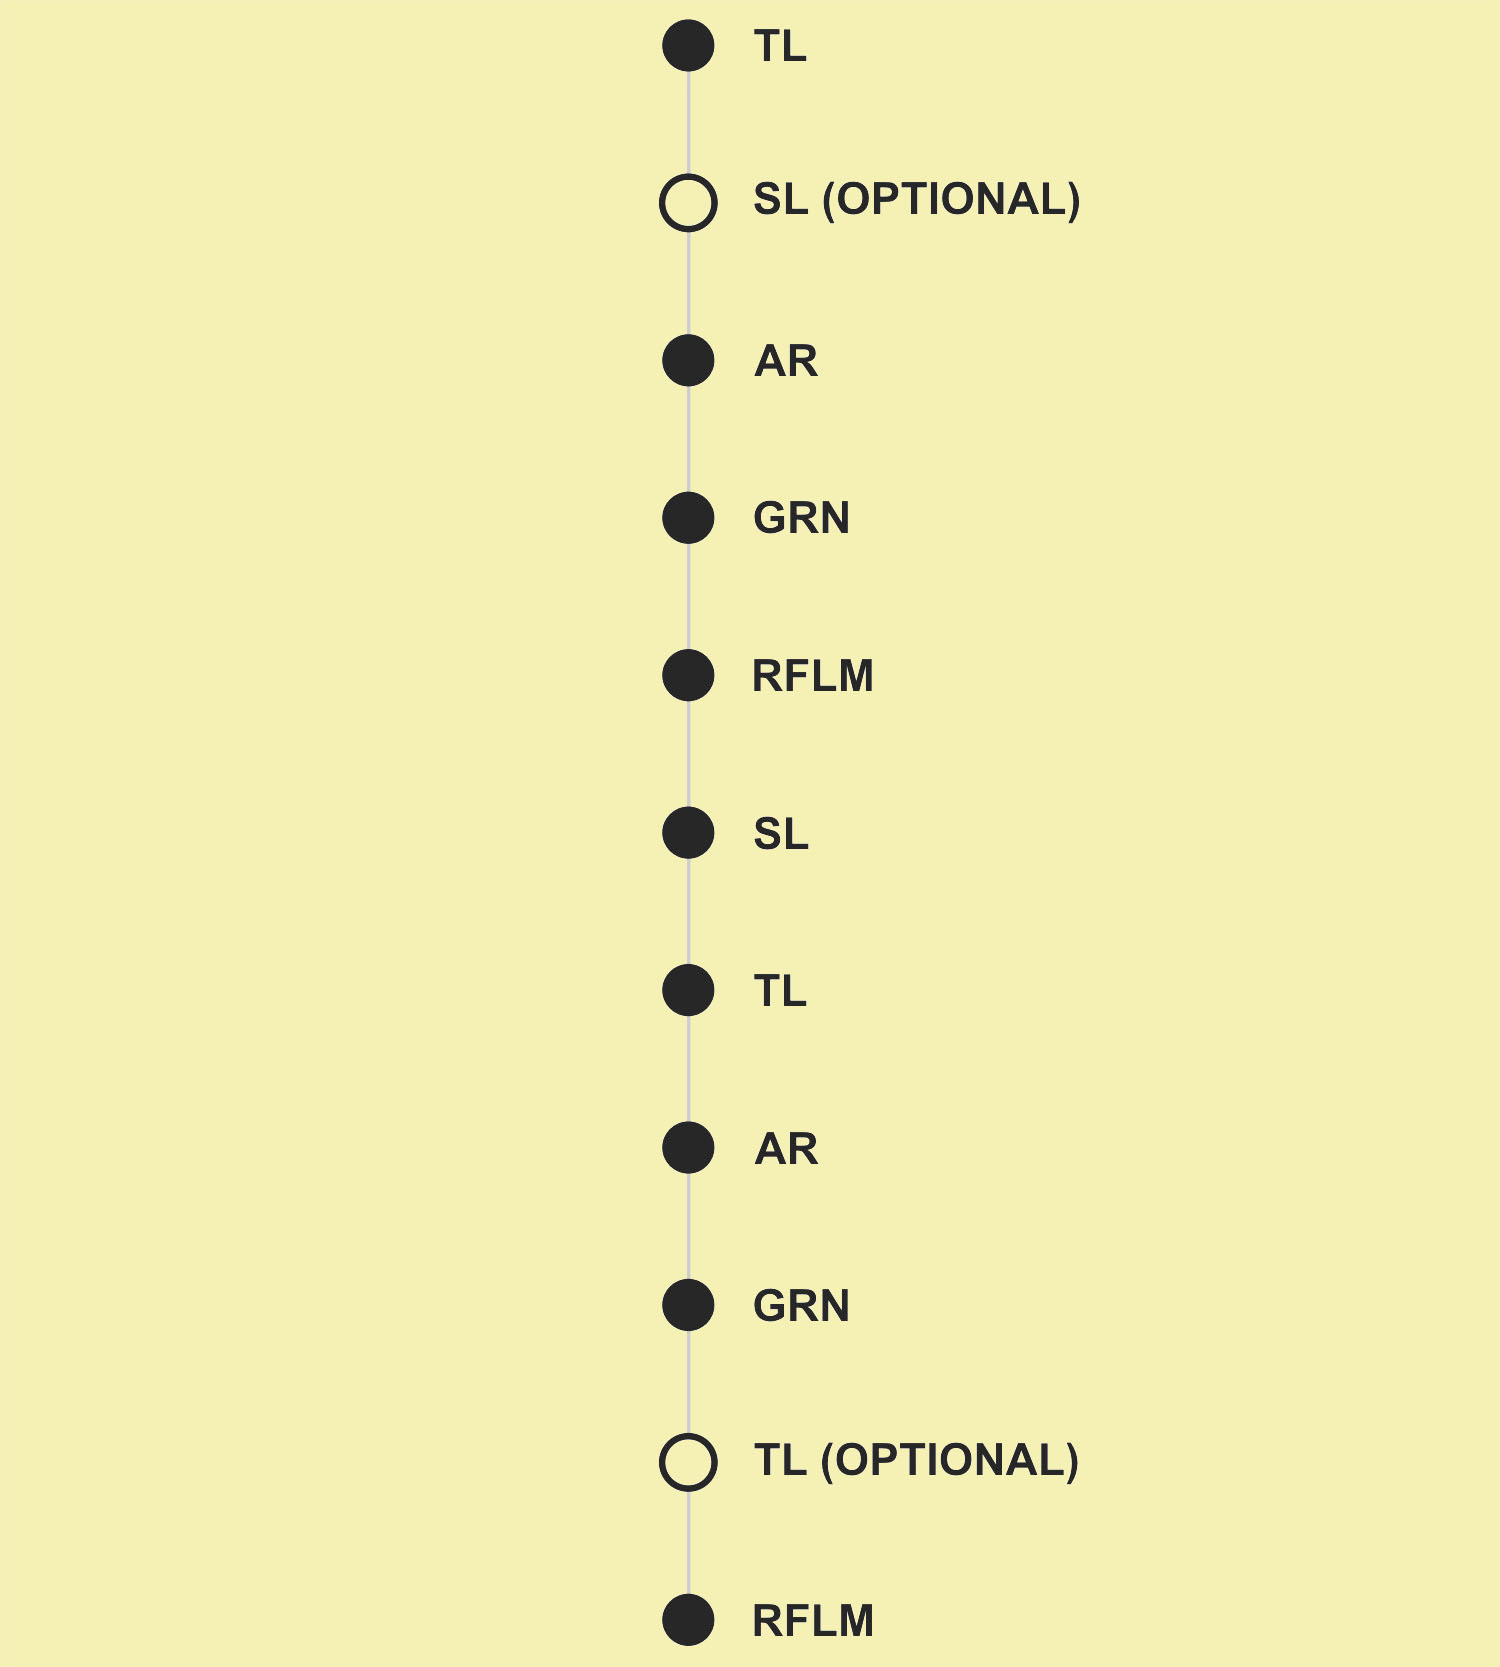
Figure 2-8: Fire Team File
Understanding the organization and capabilities of rifle and weapons squads is fundamental to evaluating platoon operations. These organizations define the organic firepower and capabilities available to the platoon leader.
The rifle squad is the primary maneuver element of the infantry platoon. It consists of 9 personnel organized into two fire teams, each led by a team leader.
| Position | Quantity | Primary Weapon |
|---|---|---|
| Squad Leader | 1 | M4 Carbine |
| Team Leaders | 2 | M4 Carbine with M320 Grenade Launcher |
| Automatic Riflemen | 2 | M249 Squad Automatic Weapon (SAW) |
| Riflemen | 4 | 2× M4 Carbine with M320 Grenade Launcher 2× M4 Carbine |
| Total: 9 personnel | 7× M4 Carbine | 4× M320 Grenade Launcher | 2× M249 SAW | ||
| Position | Typical Ammunition Load |
|---|---|
| Squad Leader | M4: 210 rounds (7 magazines × 30 rounds) Grenades: 2× fragmentation, 1× smoke |
| Team Leaders | M4: 210 rounds (7 magazines × 30 rounds) M320: 18-36 rounds 40mm (mix of HE, smoke, illumination) Grenades: 2× fragmentation, 1× smoke |
| Automatic Riflemen | M249 SAW: 600 rounds (typically 3× 200-round drums or linked) Rifleman assistant carries: Additional 200-600 rounds for SAW Grenades: 2× fragmentation, 1× smoke |
| Riflemen (4 total) | 2× Grenadiers: M4 210 rounds + M320 18-36 rounds 40mm + grenades (2 frag, 1 smoke) 2× Riflemen: M4 210 rounds + grenades (2 frag, 1 smoke) |
| Planning Factor: ~1,400-1,600 rounds of 5.56mm per rifle squad (not including SAW), plus 40mm grenades. Squads cross-level ammunition based on mission. AT-4s or other anti-armor weapons distributed as needed (typically 1-2 per squad). Resupply planning accounts for 50% expenditure triggering refit. | |
The weapons squad provides the platoon's medium machine gun and anti-armor capability. It does not maneuver independently like rifle squads but provides supporting fires to enable rifle squad maneuver.
| Position | Quantity | Primary Weapon |
|---|---|---|
| Squad Leader | 1 | M4 Carbine |
| Medium Machine Gun Teams (2 teams): | ||
| Gunner | 2 | M240B Machine Gun |
| Assistant Gunner | 2 | M4 Carbine |
| Ammunition Bearer | 2 | M4 Carbine |
| Close Combat Missile Teams (2 teams): | ||
| Gunner | 2 | Javelin, M4 Carbine |
| Total: 9 personnel | 7× M4 Carbine | 2× M240B Machine Gun | 2× Javelin | ||
Formations provide the framework for controlling the squad/platoon during movement. The SL/PL selects formations based on METT-TC, balancing control, flexibility, security, and speed.
Source: ATP 3-21.8 Doctrine Supplement, Infantry Platoon and Squad
| Formation | When to Use | Advantages | Disadvantages |
|---|---|---|---|
| WEDGE | Primary formation when enemy contact is possible but not expected | Good all-around security; Flexible; Easy to control | Requires open terrain for proper dispersion |
| FILE | Restrictive terrain (dense vegetation, urban, trails); Night movement | Easy to control; Good for restricted terrain; Reduces silhouette | Vulnerable to frontal fire; Slow to deploy; Limited firepower forward |
| LINE | Assaulting an objective; Crossing danger areas; Maximum firepower needed | Maximum firepower to the front; All weapons can engage | Difficult to control; Vulnerable to flanks; Limited flexibility |
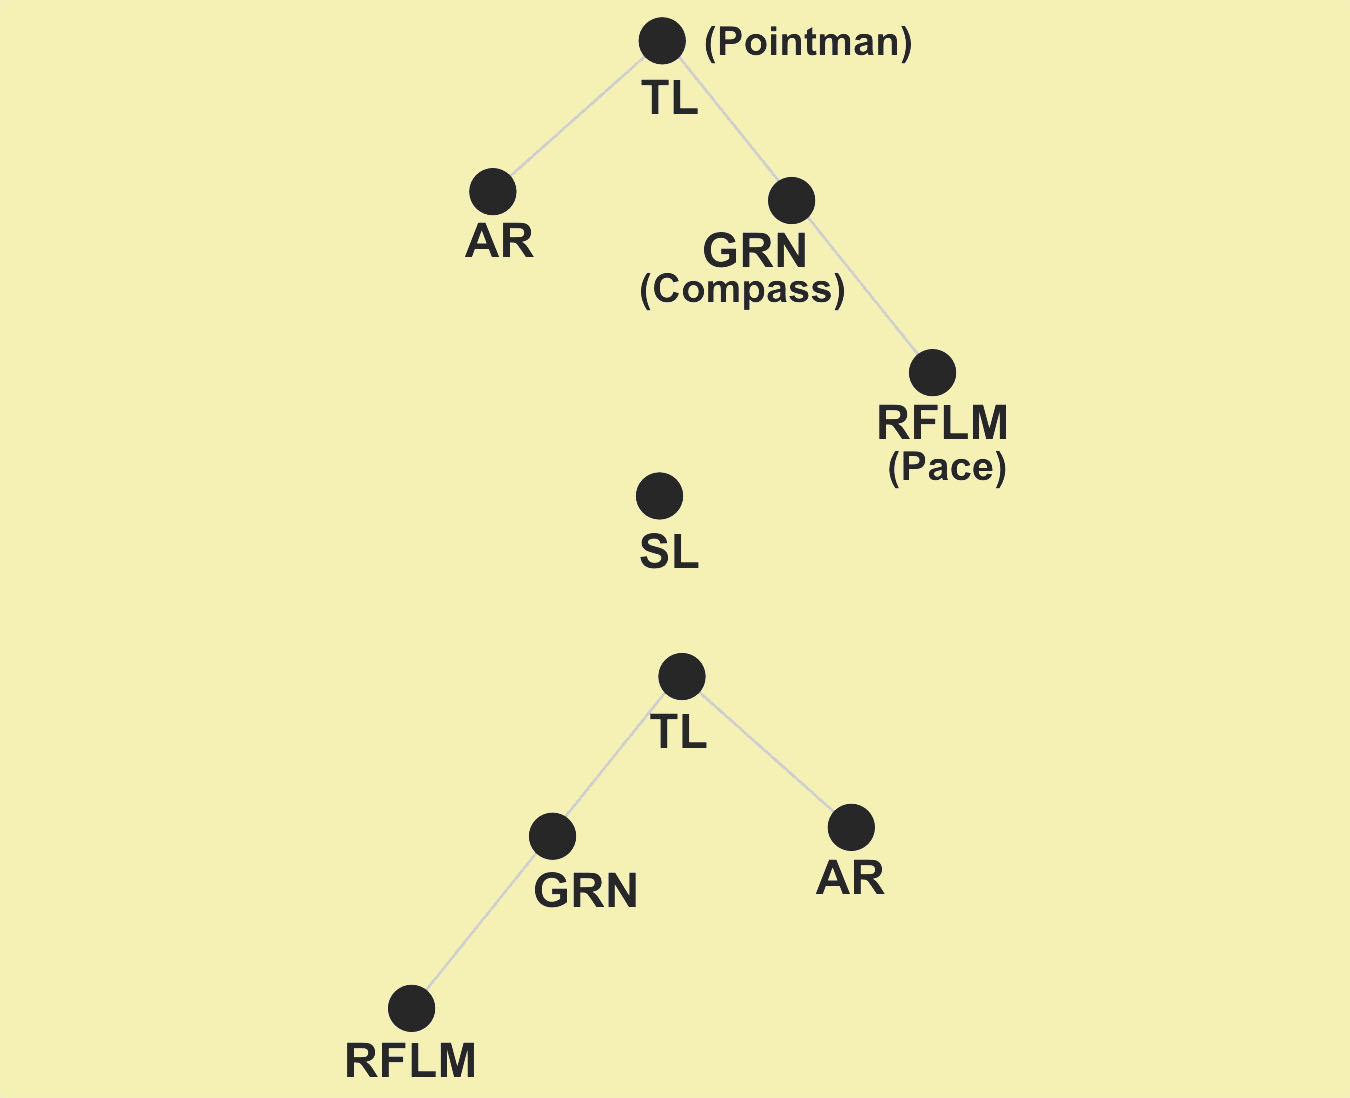
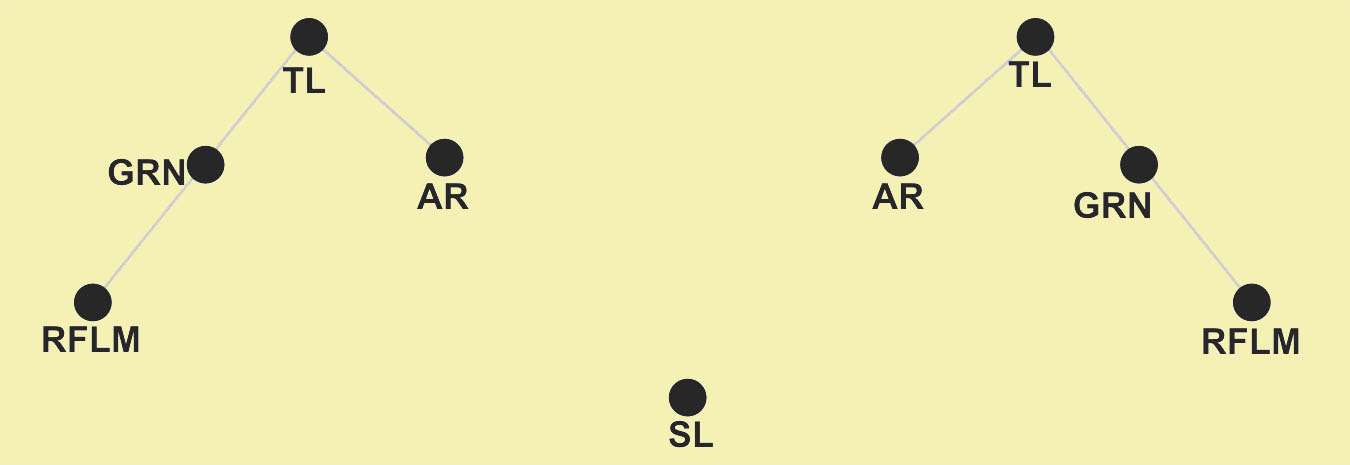
Platoon formations are built from squad formations. The PL positions squads relative to each other based on threat and terrain. Hand and arm signals enable silent communication.
| Formation | Characteristics | Advantages | Disadvantages |
|---|---|---|---|
| LINE | All elements in a row; Fires oriented forward; One subordinate designated as base | Generate fire superiority to front; Clear large area; Transition to bounding overwatch or assault | Control difficulty in limited visibility; Vulnerable flanks; Slow; Large signature |
| COLUMN/FILE | One lead element; Fires oriented to flanks; Minimal to front; One route | Easiest to control; Leader can communicate with lead element; Generate maneuver element; Speed | Reduced fire to front; Transitions poorly to assault; Vulnerable to enfilade fire |
| VEE | Two lead elements; Trail moves between leads; "Reverse wedge"; Two routes forward | Fire superiority to front; Generate maneuver element; Secure flanks; Transition to bounding/assault | Control difficulty in limited visibility or restrictive terrain; Potentially slow |
| WEDGE | One lead element; Trail elements paired abreast on flanks; Situation uncertain | Control even in limited visibility; Transition to base of fire or assault; Secure front and flanks | Trail elements must clear own path; May need to transition to column in restrictive terrain |
| ECHELON (L/R) | Elements deployed diagonally; Observation and fire to front and one flank | Assign sectors to front and flank | Difficult to maintain; Vulnerable to opposite flank |
| BOX | Two lead elements; Trail elements follow leads; All-around security | Same as vee formation | Same as vee formation |
Movement techniques describe HOW elements move relative to each other. The leader selects based on likelihood of enemy contact, need for speed, and terrain.
| Technique | Contact? | Speed | How It Works | Dispersion |
|---|---|---|---|---|
| TRAVELING | NOT likely | FASTEST | All elements move continuously; ~20m between elements | Least |
| TRAVELING OVERWATCH | POSSIBLE | MODERATE | Lead moves; trail follows at distance that allows support by fire (~50m); Both move continuously | Moderate |
| BOUNDING OVERWATCH | EXPECTED | SLOWEST | One element MOVES while one OVERWATCHES; Elements alternate; Overwatch provides security | Greatest |
A danger area is any place where the unit is vulnerable to enemy observation or fire. Crossing danger areas is a critical tactical task that requires planning, control, and security.
| Type | Examples |
|---|---|
| LINEAR | Roads, trails, streams, railroads - anything narrow enough to cross quickly |
| OPEN AREA | Fields, meadows, parking lots - large areas without cover; may require detour |
| ENEMY AREAS | Known or suspected enemy positions, obstacles, minefields |
Battle drills are standardized collective actions rapidly executed without a deliberate decision-making process. Soldiers execute drills instinctively based on training. Per CMP: "WTBDs were previously taught and tested in basic combat training. There is no requirement to reteach these tasks in OCS."
Situation: Squad receives direct fire from enemy while moving dismounted
Actions:
Situation: Element receives fire from enemy
Actions:
Situation: Element must disengage from enemy (outmatched, mission requires withdrawal)
Actions:
KEY CONCEPT: Response depends on whether ambush is NEAR or FAR
NEAR AMBUSH (within hand grenade range, ~35m) — TC 3-21.76, Battle Drill 07-3-D9502:
FAR AMBUSH (beyond hand grenade range, >35m):
React to Ambush is the most likely inject during movement phases. Evaluate the candidate on:
Situation: Element identifies enemy bunker during movement
Actions:
Situation: Team must clear a room during urban operations
Actions:
This section covers the basic framework for offensive operations that candidates will plan and execute during FLX. The candidate must demonstrate understanding of the purpose and organization of each element.
| Element | Purpose | Typical Tasks |
|---|---|---|
| SUPPORT BY FIRE | Fix and suppress enemy; Prevent enemy from repositioning or reinforcing | Establish base of fire; Suppress enemy positions; Shift fires on signal |
| ASSAULT | Close with and destroy the enemy; Seize the objective | Maneuver to assault position; Assault through objective; Clear enemy positions |
| SECURITY | Protect the force; Provide early warning of enemy | Establish ORP security; Cover flanks/rear during assault; Screen withdrawal |
The ORP is the last covered and concealed position before the objective where the patrol halts to finalize preparations.
After seizing the objective, the element must secure the position and prepare for the next mission.
CONSOLIDATION (security):
REORGANIZATION (sustainment):
The ambush is one of the primary STX lane missions for OCS candidates. It is a surprise attack from a concealed position on a moving or temporarily halted target. Understanding ambush types, formations, and execution sequence is critical for evaluating whether candidates can plan and lead this operation.
Reference: TC 3-21.76 Ranger Handbook, Chapter 7 (Patrols); ATP 3-21.8, Chapter 4
| Category | Types | Description |
|---|---|---|
| By Planning | Hasty | Executed when a patrol makes unexpected visual contact with an enemy force and has time to set up without being detected. Relies on rehearsed SOPs and hand/arm signals — no formal order is issued. |
| Deliberate | Conducted against a specific target at a predetermined location. Requires detailed planning, rehearsal, and coordination. The leader needs intelligence on enemy size, composition, route, and timing. | |
| By Deployment | Point | All elements deployed to cover a single kill zone. Most common at the squad/platoon level in STX lanes. |
| Area | Multiple point ambushes around a central kill zone. Elements engage targets simultaneously or sequentially. Typically company-level or above. |
The deliberate ambush is the primary ambush type used in STX lanes. The sequence below follows the Ranger Handbook methodology.
| # | Step | Key Actions |
|---|---|---|
| 1 | Secure & Occupy ORP | Patrol halts 200-400m from the objective. Establish 360° security. Account for personnel. Disseminate information. |
| 2 | Leader's Recon | PL takes key leaders forward to confirm the kill zone, select positions for assault/support/security elements, and finalize the plan. Pinpoint the kill zone, SBF position, and withdrawal route. |
| 3 | Emplace Security | Security element departs ORP first. Establishes OPs on flanks and along enemy avenues of approach to isolate the kill zone and provide early warning. |
| 4 | Emplace Support | Support element moves to SBF position. Orients weapons on the kill zone. Establishes sectors of fire and TRPs. Confirms communication with PL. |
| 5 | Emplace Assault | Assault element occupies concealed positions along the kill zone. Emplaces obstacles/claymores if available. Sets the LOA (limit of advance). The assault element is the last element emplaced and the first to withdraw. |
| 6 | Initiate Ambush | PL initiates on signal (command-detonated device, key weapon, or command). Entire kill zone must be covered by fire. All elements engage simultaneously. |
| 7 | Assault Through | Support shifts or lifts fires on signal. Assault element assaults through the kill zone to the LOA. Clears enemy positions. Collects EPWs and PIR. |
| 8 | Consolidate & Reorganize | Establish hasty defense on the LOA. ACE report. Treat casualties. Conduct hasty search of enemy personnel and vehicles. Collect PIR items. |
| 9 | Withdraw | Withdrawal by echelon: Assault first, then Support, then Security last. Elements collapse to the ORP. Account for all personnel and sensitive items. Report to higher. |
A hasty ambush is triggered when the patrol detects an enemy force and can set up without being detected. There is no time for a formal order — execution relies on previously rehearsed SOPs.
Ambush operations test multiple TLP steps simultaneously. Key evaluation points:
Common candidate errors: Failing to establish security first; no clear initiation signal; support element not in position before assault element; no LOA designated; forgetting to plan withdrawal; poor consolidation/reorganization.
The Field Leadership Evaluation Report (FLER) evaluates candidates on the 8 TLPs, not tactical execution. Understanding how tactical tasks connect to TLP evaluation helps focus your assessment.
| TLP Step | What to Observe in Tactical Context |
|---|---|
| 1. Receive the Mission | Does candidate analyze enemy, mission, and time available? Do they conduct a proper back-brief? |
| 2. Issue Warning Order | Does candidate provide timely WARNO with mission, timeline, and specific guidance to subordinates? |
| 3. Make Tentative Plan | Does candidate develop a COA addressing scheme of maneuver, formations, movement techniques, and actions on objective? |
| 4. Initiate Movement | Does candidate conduct initial inspections? Begin movement to position the element? Execute contingency plans? |
| 5. Conduct Recon | Does candidate confirm/deny key assumptions about terrain, enemy, and objective? Update plan based on recon? |
| 6. Complete the Plan | Does candidate finalize scheme of maneuver, task organization, and control measures based on recon findings? |
| 7. Issue the Order | Does OPORD include clear situation, mission (stated twice), execution with scheme of maneuver, and command/signal? Uses terrain model? |
| 8. Supervise/Assess | Does candidate conduct rehearsals, PCC/PCI, and maintain control throughout execution? Adjusts plan as situation develops? |
FOR TRAINING USE ONLY | TAC's Tactical Quick Reference – ATP 3-21.8 / TC 3-21.76
Created by Matt Wagner | Source: github.com/mattgwagner/tlp-opords